Wednesday, August 31, 2011

Sunset

Before After
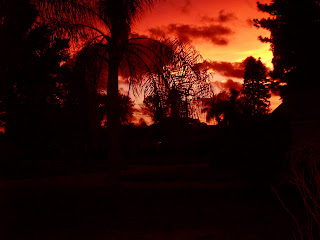
For this assignment I watched the Photoshop CS5: Creative Effects "Improving sunset with color balance video. I took this photo a while ago. I was captivated by the colors of the sunset. So I decided to make the colors richer by editing the color balance. First I clicked the shadows option under tone and added more red, magenta and yellow. I did the same with midtones and made very slight adjustments to the highlights. Next I duplicated the photo by pressing command + j. This provided me with 2 adjustment layers which gaver depper richer tones to the image. Next I blended the colors on soft light mode and added more red, magenta and yellow to the shadows. This gave more contrast. I then turned the visibility of the duplicate layer back on. Next I brought down the opacity of the duplicate layer and then lowered the contrast until I got a nice mix. I am quite pleased with the sharpness and richness of the new photo.

whatever


Signs - Shanna Ferris

Before:

After:


For the picture, I watched "Removing an object from its background," "Creating and modifying a shadow," and "Modifying a directional shadow" in order to isolate this sign and create its shadow. This is going to be one step of my photoshop project and it, to an extent, takes the theme a bit literally.


I watched many videos in Photoshop CS5 One-on-One: Fundamentals. I layered the first image of the girl over the second image of the scribbles. I lighted the scribbles layer and changed the hue and saturation on both pictures. These pictures are symbolic of the artist within every child, that anyone can make art. Art is a universal talent that everyone shares even as a child. The scribbles in the background represent the creativity we hold inside of us and then express through any media, even crayons.

Shannon Kaestle Photoshop Tutorial Assignment

static, blur, action


Followed tutorial from "Photoshop Top 40 : #30 - Actions" to create the water droplets. Originally used noise and gaussian blur filters while recording with Actions window to randomly generate black/white organic shapes. Then loaded a pre-created Action file (created by Lynda.com) to make the black shapes translucent. I lastly added a cyan gradient for color.

"Great Barrier Reef" is an altered book I'm currently working on, in which I've been spraying water, spilling ink, and painting the pages to distort the information for a less linear narrative of exploration.


I have watched tutorial videos regarding working with layer effects and styles. The videos introduce the various effects offered in Photoshop CS5 and how to such things as move, copy, or even remove undesired effects. These videos touch on the idea of transparency, opacity, blending, embossing, beveling, and many useful layer effects.

I have taken two photos and combined them using various effects.. I hope you like.. and
GO GATORS!


Before:


After:


nature is symbolic of our origin. It is my belief that when we die, our energy goes into the earth and lives within nature. And when we are born, we borrow energy from the earth to power our bodies through this mortal life. The cycle repeats itself. This is just one of my theories of life and death, but I truly believe that human beings are connected to nature on an extremely deep physical and spiritual level.

I watched various tutorials on Lynda, and learned how to use adjustment layers, which I had never worked with before. My goal in this edit was translate the original image into black and white while still retaining the original's same rich tonal and textural quality. I duplicated the image and ran each copy through a different preset black and white channel mixer adjustment. I adjusted the result of each preset adjustment with the Curves tool. I then layered the two images, the darker edit on the bottom. I selected the Lighten blending mode on the top layer to transfer the leaf texture onto the bottom image. I then erased a portion of the top image around the figure's hairline, so as to create the illusion that she is dissolving, or becoming one, with her natural surroundings. Finally, I used the Unsharp Mask filter to make the edges of the image more crisp and defined. 

original:

edited:


Thank you to Becca Agatstein for modeling for this image.

— Cristi López


I watched two videos from the lynda.com websites. The first video I watched from the lynda website was titled Masking highlights and shadows. Then I watched the video which explains how to remove people from images. Of these two videos the one I like the most was the video about masking highlights and shadows. Therefore, I took the image of me below and applied some of the techniques I learned from the masking highlights video. In order to change the highlights and shadows of this image I went to the select tab of photoshop, then I clicked the color range option which allowed me to change the highlights and shadows.

I like the way I changed this photograph because it is easier to see the value in this image. Also, I like how you can not tell the color of the person's skin in this image.

Willie Barron


mail.jpgorde

Symbols/Signs


Before (first image) and After (second image).

Since it has been a long time since I used Photoshop,I decided to start from the beginning so that I wouldn't skip over anything important. I watched "Photoshop CS5 One-on-One: Fundamentals" from the very first video through the video on liquifying an image. I then watched a later video in the same series on how to adjust brightness and contrast. After opening the original photo in Photoshop, I heightened the contrast and dimmed the brightness to give it the appearance of nighttime. As far as symbolism is concerned, I find that changing the brightnes and contrast of this piece has completely changed its meaning. What at first appeared to be a woman running to escape a rainy day, turned into a woman running from the night. One is lighthearted and free, the other tense and heavy.Even though the image retains its black and white color scheme, it has acquired an entirely new emotional response.


-Libby Schinnow


Tuesday, August 30, 2011


I started out by watching chapter 12 which was "Using Hue/Saturation and Target Adjustment Tool." The examples in the chapter were more for correcting and changing the color of certain parts of the picture but I changed the hue drastically and over-saturated the piece so that the colors became totally different from the original picture. Then I watched chapter 13 "Levels" so that I could change the contrast of the piece, making the image much sharper and more clear. I chose to edit this picture of a brontosaurus skeleton because it is a huge (literally) reminder and sign of the passage of time and the inevitability of death. Also the fact that we as humans will display something that once was the framework for a living thing is also very fascinating and strange if you think about it.


left and middle images are before, far right image is after:

I watched a few of the top 40 most useful tools of photoshop, and I watched ch. 4 new painting features, "using the HUD color picker". These were really helpful especially the top 40 videos, but I ended up just experimenting with the free trial of photoshop and I used the quick selection tool to select a picture of a baby giraffe, and then I cut and pasted it on top of a painting I like called The Beach (A Praia) by Beatriz Milhazes:
Symbolically, I like the idea of contradictory images, so I put the giraffe in front of a background that it's not naturally seen in front of. So it produces a little confusion and it's visually stimulating because the painting itself is so interesting and because of layering the images in general.


More symbols/signs


I watched the Photoshop for Designers tutorial about layer effects. I used this photo of a bike and added the plastic wrap filter. Afterwards, I added the layer effects inner glow, bevel and emboss and satin. I used this photo for the theme this week because I thought about using a bike as a symbol of transportation, movement and clean energy.


Before:


After:


Monday, August 29, 2011

          I watched the "Foundations of Photography: Black and White" lessons and converted this photo to greyscale with a black and white adjustment layer. I also blurred the background, sharpened the hand in the foreground, and dodged/burned specific areas. I'm interpreting the signs theme as a depiction of universally understood signs among people.

Before:

After:

-Rebecca Agatstein

Sunday, August 28, 2011


For this photo I just selected various parts using the polygonal lasso tool and changed the exposure and contrast. As far as the symbols go, it's supposed to represent body language as a symbol or sign.

Friday, August 26, 2011

Modern day Cave Drawings, Leaving your mark


Here are just a few images from our exercise yesterday, I will upload the rest throughout the course of the weekend and wanted you all to know you can "grab" any of these images by just clicking and dragging them onto your desktop (this is MAC only techniques), which may or may not be a good option for the homework this week which asks you to edit one image.


Thursday, August 25, 2011

Meet at the Harn Museum next class!


Link above shows directions on how to get to Harn. We will meet there at NOON next Thursday or 11:45 at class and we can take the bus over together!

Meet at the Harn Museum next class!


Visual Language Exercise

We will be doing a visual communication exercise today which will function as both an introduction of yourself through choice of symbols/text/color/gesture/size/etc. and could be the basis for your first photoshop exercise.

During the course of the week you should watch at least one tutorial on Lynda.com for basic photoshop intro and for details on how to select a photo/image, upload and apply at least one edit to existing image. Save this image as a jpeg and upload to the blog!

This image will be your first post and should include your inspiration of imagery.


Lynda.com


Wednesday, August 24, 2011

Welcome to WIFT!

Hello and Welcome to our class blog!!! This will be our site to upload, discuss and explore ideas and art through our workshop.